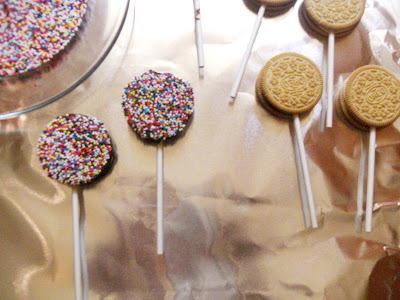
Ooh, these are bad! And by bad I mean good. Despite the fact that they only have about 100 calories each, the fact that I can sit down and eat however many I just made makes them evil. In a good way. Unless you're trying to lose weight. But still delicious. Especially if you can use some self-control or share them with friends.
I got the original idea from here via Pinterest. I held out on Pinterest for as long as I could because I knew it would be addicting-- I already have hundreds, if not thousands of things bookmarked, so I knew that somewhere that I could organize bookmarks with pictures and share them would be just too amazing. And it is! I love Pinterest-- mostly because I love that you can view a picture with every website. I'm such a visual person, so that really helps me remember what I pinned!
I decided to go with golden oreos (after consulting Sam) since I was using dark chocolate and not white for the coating. This was an excellent choice. These taste like the Keebler Fudge Stripes I used to have in my pre-vegan days. Except covered in sprinkles. And on a stick. So yummy and cute! You could also use chocolate oreos or Newman O's.

Ingredients:
- 12 golden Oreos
- 12 pop sticks (I used these and I found them at my normal store in the cake decorating section)
- 3/4 cup chocolate chips (I used Ghirardelli semi-sweet baking chips- they're dairy free)
- about 2 tablespoons rainbow sprinkles
Directions:
- Melt your chocolate either over a double boiler or in the microwave in 30 second intervals, like I did.
- Prepare your surface-- something large enough to sit flat in your fridge or freezer-- I used a cutting board covered in foil, but you could use parchment paper, or waxed paper if that's what you have on hand.
- Slide your cookies apart and put a bit of chocolate on the cream side of one. Lay the stick on top of the chocolate and twist the stick so that the stick is covered with the chocolate. Then replace the top of your cookie and press down slightly so that the stick sinks into the cream filling a little. When all of them have sticks, stick (get it? sticks, stick? I guess there's not much to get, I just liked the double use of the word) well, stick the whole thing into the fridge or freezer until the chocolate completely hardens (15-30 minutes is my guess).
- When the chocolate has hardened, take your cookie pops out of the fridge or freezer, re-warm the chocolate if it needs it and pour your sprinkles into a saucer-- the cool thing about this is that you can dump the whole bottle in if you want, because whatever doesn't stick to your cookies just falls right off, with no chocolate on it, and can be put back into the bottle and re-used.
- Now that you're set up, it's time to get coating! I found the best way to cover the cookies in chocolate was not to dip-- that was way too thick and messy. What I did was to use a fork to get a big dollop of chocolate onto one side of the pop, then push it over the edges, cover the other side withe chocolate, and then use the fork to scrape off the excess, first from the edges and then each side. Then I gave the pop a little shake to smooth out the ridges and swoops-- this is where good chilling comes into play-- if the center hasn't hardened, your pop might fall apart when you shake it!
- Next, dip one side of your pop into the sprinkles, re-dipping if it's not entirely covered. Set it sprinkle side up onto the foil and repeat for the rest of your cookies.
- Pop it back into the fridge or freezer until hardened (about 30 minutes- an hour). Then you can store them in baggies or a container in the fridge.
For one cookie pop: cals: 112kcal | fat: 5.96g | carbs: 16.75g | prot: 1.08g
I love how fun these are with the colorful little sprinkles and you could definitely use any kind or color of sprinkles for a different look. They would be great for baby showers or kid's birthday parties (or adult birthday parties, for that matter)!
They travel pretty well too. I even took them to a kickball game-- I just kept them in a mini cooler straight from the freezer. They were just a little melty by the end of the game but they were still delicious!
Yum.


No comments:
Post a Comment