Showing posts with label unprocessed. Show all posts

Tuesday, December 10, 2013

Easy Chickpea Kale Bowl


We take a break from our regularly scheduled Thanksgiving updates to give you this yummy bowl. 


Vegans seem to eat things in bowls- just lots of stuff piled together in a bowl and it makes a meal. When we were staying with my family for a couple of months, my mom commented that it was a bit weird, but I've been vegan for 3 years and I mostly eat at home, where other people aren't looking, so I hadn't really noticed. But it is a little weird. I'll have to remember to share my favorite bowl with you guys sometime. I keep forgetting and I don't have any pictures. This one's really good though, and super healthy.

I also want to start sharing more of what I actually eat every day. Sure, I make a few recipes a week and generally live off the leftovers of big batches of soup or whatever, but I also make other, super simple meals. I'm sure other bloggers can relate to me on this-- there are just some meals that don't seem photo- or recipe-ready, or you don't want to bother with clearing off the table just to take a picture of your super-simple-but-super-yummy oatmeal. But I'm beginning to think it's worth it, and I remember particularly that daily food sharing forums from Veggie Boards and What I Ate Wednesdays really helped give me some good ideas when I was starting out-- they still do! So here is one of those quick posts-- it's super simple, not really a recipe, but yummy and I remembered to take a picture! You could really change up the ingredients endlessly, but this is what I had for lunch (and dinner, rolled up in a tortilla) yesterday. It was delish.

Chickpea Kale Bowl

Also, you can go check out my Pinterest page for ideas-- I pin stuff from here but mostly a ton of other things including a massive Vegan Recipes the Inspire Me board full of ideas and recipes!

Here goes!

2 Servings
Ingredients:
  • 1/2 tsp or small drizzle olive oil
  • 5ish baby portabella or cremini mushrooms, sliced
  • 1 celery rib, sliced or diced, your preference
  • small bunch fresh parsley
  • 2-3 big sage leaves or other fresh (or dried!) herbs
  • 3ish cups of ready-to-go kale, or other green, or chop and wash your own
  • 1 can of chickpeas (my favorite, but your could use any bean
  • balsamic vinegar, olive oil, salt and pepper to taste
Directions:
  •  Drizzle tiny amount of oil into a relatively large pan-- I used my stockpot but I think the big skillet would have worked.
  • Drain your chickpeas in a colander and run water over them until they are fresh-looking and don't have that bubbly, gooey can juice on them anymore.
  • Slice or dice your veg and add to the pot, turning it on medium.
  • I love parsley and the amount I use is a small handful, about 1/4 cup once chopped. Take the tops off of your parsley by pinching or cutting. Slice your herbs thin. Then chop it all up together, alternating directions and re-scooping your pile until it's all finely chopped. Or you don't have to and just leave it chunky.
  • Add to the pot, then immediately add your greens.
  • Let them cook a couple of minutes, add some salt, pepper, and olive oil.
  • Add your chickpeas and cook a couple or more minutes 'til they're warm.
  • Finish off with a drizzle of balsamic--  taste as you go because it can get real crazy real quick-- and more salt and pepper, and voilà! Yum.
Note: If you use spinach as your green, add it last so it doesn't cook too long.

Also, I haven't been putting nutrition info on here because I wasn't counting calories for a while, and then I changed the program I used and the info format is different, but I know some of you liked that and I'm tallying again so here you go! 

cals (using 1.5 tsp oil) per 1/2 recipe: 286kcal | fat: 7.80g | carbs: 43.78g | prot: 15.26g

Tuesday, November 12, 2013

Super Quick Warm Salad with Popped Snap Peas


This salad is super yummy and super quick. I'm working on the house today and don't have a ton of time to cook, but I wanted something warm and super healthy. That's where this salad comes in. And I love the way sugar snap peas sound when they're snapped, more of a round "pop" than a snap, so that's what I'm calling them -- popped snap peas! Using pre-washed greens and washing your tomatoes when you bring them home from the store makes this a super quick meal. Also, these pics are bit bit blurry because of the whole, not a lot of time today thing. But, you get the idea, and I'll retake them eventually!

Warm Salad with Popped Snap Peas

3 cups greens -- I used baby spinach and mixed spring greens
handful of canned chickpeas, drained and rinsed
drizzle of olive oil
several turns of fresh pepper
handful of grape tomatoes
juice and zest of one lemon
handful of sugar snap peas, "popped" in the middle

Tear your greens into a bowl. Add the rest of the ingredients except the lemon juice to a warm skillet, cover and cook on high just for a couple of minutes until your chickpeas are a bit browned. Add the lemon juice and let cook for a minute to reduce the acidity and increase sweetness. Pour contents of skillet over your greens and top with more olive oil and pepper, if you want. Enjoy!

Monday, November 11, 2013

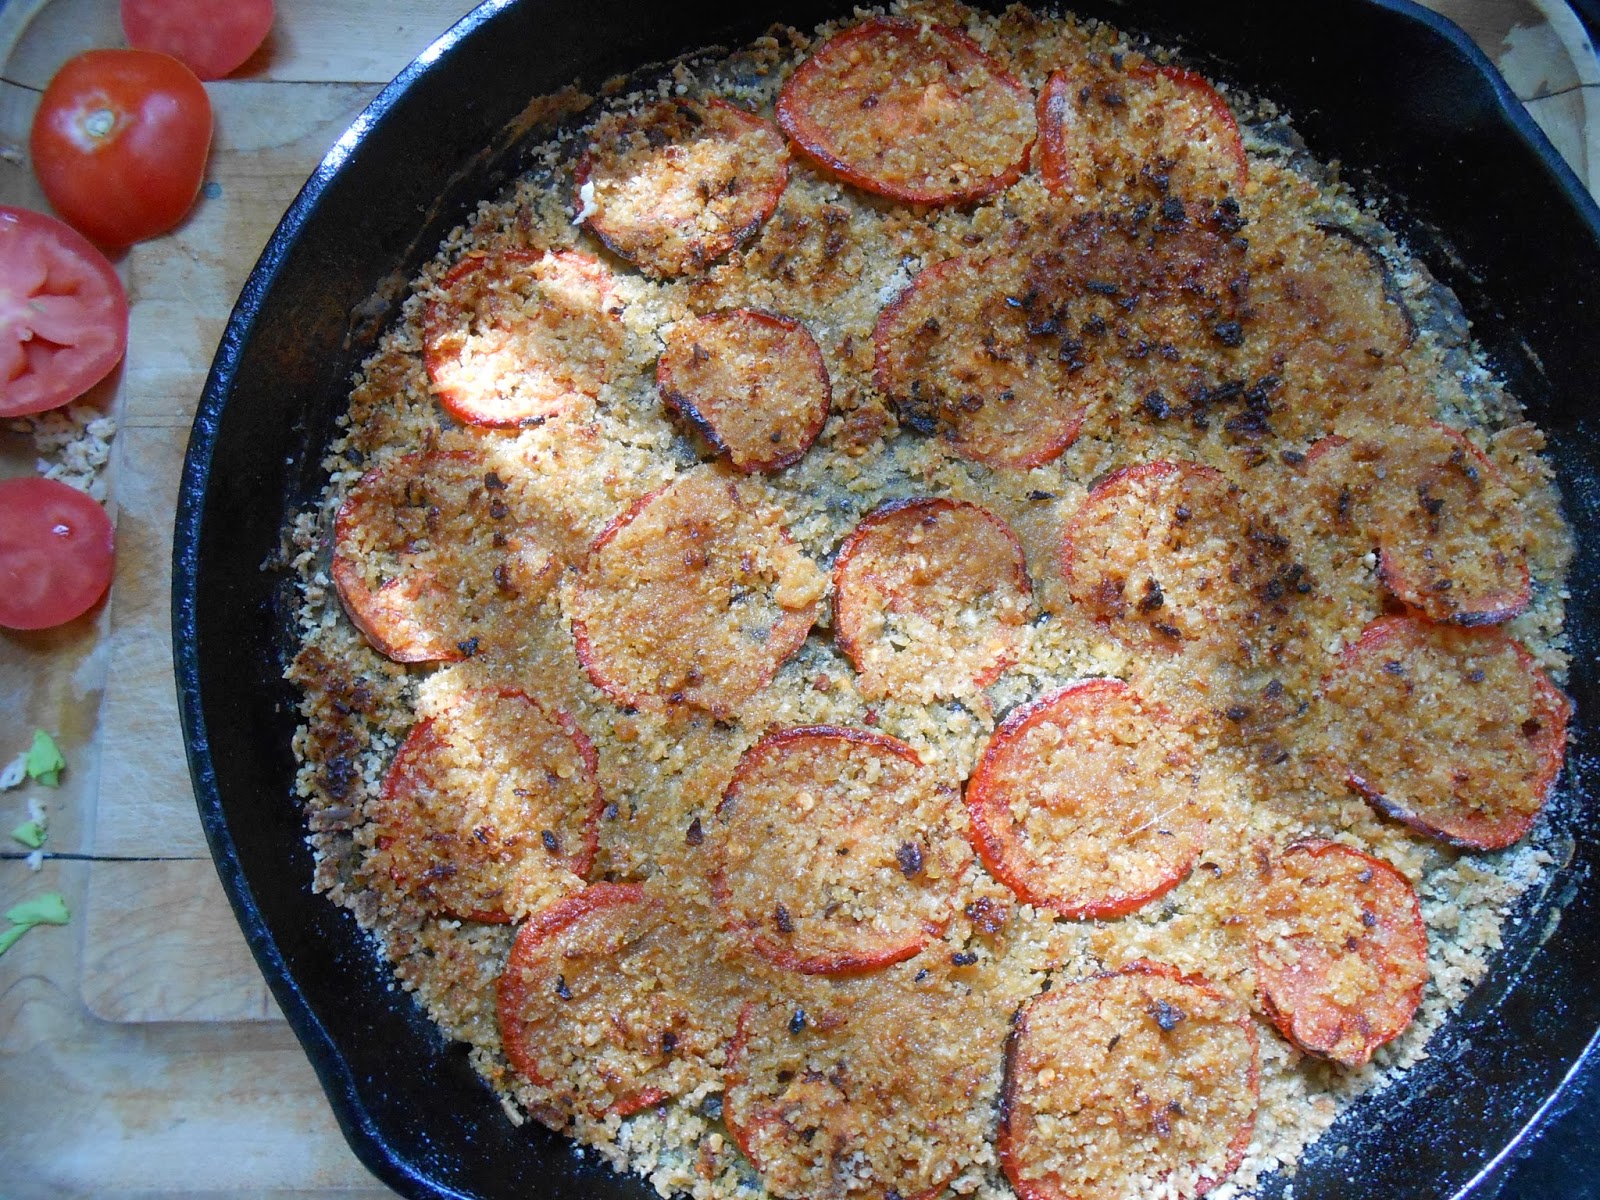
Chickpea Florentine Tart with GF Breadcrumb Topping


Here's another one out of Cooking for Isaiah. I've modified it quite a lot to replace the eggs, and what I've ended up with is a deliciously hummus-y florentine tart that both me and Sam can eat! Yay!


1 can great northern beans, drained and rinsed
1 can chickpeas, drained and rinsed
1 T tahini
1 tsp egg replacer powder (optional, I think)
1/2 tsp garlic powder or onion powder
juice of one lemon
1/2 cup water
salt and pepper, to taste
1 package spinach, thawed
1 T olive oil, to grease the pan

2 small tomatoes, thinly sliced and lightly sprinkled with salt
1/2 cup rice cereal crumbs
1/2 tsp red pepper flakes
1 clove garlic, grated
more olive oil, for drizzling

Add everything from the first list except the spinach and oil to a blender. Blend for a couple of minutes, until thick and smooth. Preheat oven to 350 degrees Fahrenheit. Mix spinach with bean mix. Grease a cast iron skillet (a pie plate would probably work too) with the olive oil. Use the whole tablespoon, to create a nice crust.


Spoon the mixture into your skillet, top with the tomatoes, and place in the oven for about 50 minutes.


Process a bunch of rice cereal (Chex), into a breadcrumb texture. Reserve 1/2 cup, and save the rest in an airtight container-- trust me, you'll want some more later, the topping is the best part! Put the 1/2 cup back into the food processor, grate a garlic clove in there, and add 1/2 tsp red pepper flakes. Pulse. When your tart is finished, and looks golden around the edges, take it out, top it with the crumb mixture, and drizzle pretty liberally with olive oil. Broil for about 3 minutes. You can totally eat this hot from the oven, but it will slice and serve much better if it cools to at least room temp and can be served cold. Enjoy!


Monday, November 4, 2013

Hubby's Grownup Breakfast

So, I don't have a picture for this quick post because Sam took this smoothie with him to work this morning. Sam is trying to eat more fruits and vegetables -- I'm so proud of him! I'm hoping it goes well, since he has allergies to many fruits-- we're just kind of trying to ignore that for now and see if he can eat them. Maybe we'll get a better plan in the future, maybe digestive enzymes or go organic? I don't know if either of those would help. This morning I sent him off with a cup of coffee instead of an energy drink, and a smoothie instead of a breakfast sandwich. The smoothie was darn tasty, too, if you ask me. When I texted him to ask how his new breakfast was he responded that it tasted "grown up...in an ok but I'll have to get used to it way." I'm deciding to take that as a compliment!

Makes about 10 oz.

  • 1/2 small gala (or other) apple
  • 1/2-2/3 cup frozen strawberries
  • 1 medium banana, peeled, broken in half, and frozen
  • 1/2-2/3 cup orange juice
  • 2 large spinach leaves

  • If you have a high-powered blender, just put everything in and blend it up.
  • If you don't, let the banana and strawberries sit out of the freezer in a bowl for a few minutes and add the orange juice, apple, and spinach to your blender. Blend until as smooth as it'll get and then add the frozen fruit. Blend until no longer chunky. Pour into a glass or blender bottle and enjoy!

This is a perfect beginner smoothie, it doesn't look green or taste funny. It's mostly just orangey-fruity tasting. Sam actually eats spinach really well but he's never had any sort of green drink so we're going slow on that end. Who knows, this time next year, he may be taking a green juice to work in the the morning!

Friday, October 18, 2013

Raw Caramel Apples

apples awaiting their caramelly fate
Whew, mini camera emergency. I was taking a million pictures of these beautiful little apples, I stuck the sticks into them, and was taking a bunch more pictures, and poof! "Battery exhausted." Why does it get exhausted? I feel like that's a weird way to put it and I have that thought every time it happens. After a moment of panic and more than a couple of moments rummaging through boxes, I found the cord to charge the camera. Whew, crisis averted. Onto making some caramel apples. Raw caramel apples free of refined sugar! That may not sound great to you, but for those in the know, they know that dates make an amaaazing caramel sauce. And also, you don't have to cook date caramel! Now, caramel is one of my all-time favorite things, don't get me wrong, but usually it's sticky, makes a mess, and takes quite a long while. Not this time. Super quick and only uses one kitchen tool-- a food processor. You can also do this with a blender, just take a little more time, add a little more water, and scrape down the sides a lot. This is where I got to put into play my birthday present! It was my birthday on Saturday.

vegan oreo cake from Whole Foods!
I had a fun day hanging out with family, going swimming-- an all time dream of mine, to go swimming on my birthday!-- and eating some delicious beans my honey cooked, along with some homemade tortillas-- recipe for those coming later.


Homemade tortillas and Sam's amazing beans
pretty peppers, while Sam was chopping veggies to make the beans
Anyway, my father-in-law got me the most thoughtful gift! A Ninja Kitchen System. It's awesome. So far, it whips out a mean pumpkin spice tea coconut oil latte,


yummy coconut oil pumpkin spice latte-- just blend a tablespoon of coconut oil with a strong cup of pumpkin  spice tea until creamy... so yum

.... and makes the best banana ice cream ice ever had. 
 
so good

yum! check out how creamy that is!

It can also make this delicious caramel sauce. As I am typing this, I'm attempting to get the last bit of caramel out of the mug I dipped the apples in. I've already had to wash my face and hands once. It's delicious.


Date Caramel

1 cup dates
1 tablespoon peanut butter (raw if you want to keep things raw)
1/2 teaspoon salt
1/4 cup water/non-dairy milk
apples on sticks (I used kabob sticks because that's all I could find--you'd think the stores would have sticks right by the apples this time of year, but not that I saw)
other yummy toppings, if desired-- chocolate chips, nuts, etc.

Whir together in a food processor until a smooth paste is formed-- a couple of minutes. Scoop out into a bowl (or large mug) and dunk your apples in. Coat in extra yummies if you want. I'm kind of a caramel apple purist, but other toppings are good too, sometimes.

swirly caramel goodness


Thursday, March 28, 2013

Lentil Mushroom Burgers and Bunny Fries


Oh, blogland, I have so many things I want to talk to you about! I've had some fantastic BLT's lately (more on that later, but really you just need vegan bacon and mayo and I'm sure you can figure it out). I've made some crazy-good cookies, probably the best cookies I've ever made. I promise I'll share soon, but a girl can (should) only eat so many cookies and I've been recipe-testing. I've also made some fantastic protein shakes which I'll get around to posting in a bit too. Hubby and I have been going on lots of walks and playing catch in the backyard (back-strip-of-dirt?), which has been pretty awesome. It's kinda hot today though. Anyway, I've got to get ready for church, so I'll get down to it. My dinner was pretty awesome, so I'm sharing!

No, these fries aren't made of bunnies - they're carrots (obviously?). I really love carrot fries, probably more than sweet potato fries, I really wanted some for dinner, and since Easter is coming up, I thought the name fit. And I made a new (onion/garlicless) veggie burger. So yummy! I really love homemade veggie burgers and often, though I've gotten out of the habit lately, make a batch to eat throughout the week. This recipe is a bit on the moister side, so if you want you can add some breadcrumbs, more flax, or less tomato paste. They taste really great though and can also be made into a veggie loaf super easily. Without further ado, the recipes:

Lentil Mushroom Burgers/Loaf:
Makes 8 patties or 8 slices lentil loaf

Ingredients:
  • 1 cup dry lentils, simmered in 2 cups of water until water evaporates
  • 8 oz. button mushrooms, chopped
  • 1 small can tomato paste
  • salt, pepper
  • 1.5 tablespoons sunflower seeds (maybe more next time?)
  • 2 cups fresh spinach, chopped
  • 1/4 cup milled flaxseed
Directions:
  • Cook your lentils. Cook your chopped mushrooms in a large pot or skillet with a little salt and pepper on low heat until they release their moisture and turn a little darker in color.
  • Add the rest of your ingredients and mix really well.
  • Form into patties (about 1/2 cup each) or scoop into a loaf pan.
  • Spray a skillet (the same one you just used works) or swirl a little oil in the bottom. Cook your patties on medium heat, being careful not to break them. You can just smoosh them back together if they fall apart though. It might be a good idea to add a little extra flax, some breadcrumbs, or use less tomato paste if you're making patties. They were a little too wet to work with. Come to think of it, if you coated each patty in panko breadcrumbs before cooking, that would be amazing.
  • If you're making a loaf, smoosh down the top of your mixture so it's smooth, and pop into a 350 degree (Fahrenheit) oven for, I don't know, about 40 minutes. You want the top to be a little dry and browned.
  • Go make your bunny fries and enjoy!
Bunny Fries:
Serves 1 but you can multiply to make as much as you want!

Ingredients:
  • 3 medium carrots, cut into fry shapes
  • 1 teaspoon olive or canola oil (may not need more oil, even if you use more carrots, not sure)
Directions:
  • Toss your carrot fries in the oil and sprinkle with salt and pepper.
  • Bake at 450 degrees for about 30 minutes, or until browned in places, turning once.
  • It's important that these get browned! That's what makes them sweet and delicious, more like a fry and less like a carrot!
  • You'll probably want more, just so you know.
 

Thursday, March 14, 2013

Kitty Pics and a Bedtime Snack

Today has been a pretty fun one. We got out of the house this afternoon and played frisbee in the park with one of our dogs, Osgood (pics to come of him!) Then we went to the store, had dinner, and played catch. It was pretty awesome. I also took some pictures of our kitties. It's been about a year since they were born under our house. I can't believe how time has flown!


Paschal, hangin' out, bein' hansome. Doesn't he have the sweetest face? Don't let that fool you though, he's a ninja. A super cuddly nija, but still.....


Little Cat, surveying the picture-taking.


March, checking to see what Paschal's up to.....


And March trying to escape the picture-taking.


My bedtime snack -- Bengal Spice tea and cinnamon walnut 2 (in this case, 4) ingredient oatmeal cookies! So super yummy and healthy!

Wednesday, February 13, 2013

Chocolate Orange Oatmeal Cookies For Your Valentine!


These would be perfect to make for your valentine tomorrow. They have no sugar, no oil, and no flour so they're the perfect treat, even for breakfast! I may or may not have made these five times over the last week. I got the idea from this blog and I've been enjoying them immensely.

 They're super easy and there are endless variations. The basic recipe is this:
  • 1 banana
  • 1/2 cup oats -- I like old fashioned
And my favorite variations are:
  • add the zest of an orange, 1/4 tsp stevia, and 1 square of dark chocolate chopped up
  • or 1 tsp cinnamon and 3 tablespoons waalnuts
Directions:
  • Preheat the oven to 350 degrees Fahrenheit.
  • Smash up the banana with a spoon or fork, add the oats and other ingredients and mix.
  • Drop by the tablespoonful onto a greased cookie sheet.
  • Bake for 15-20 minutes.
  • Enjoy with your loved one! Or by yourself. They're really pretty healthy, I promise.
Check out the bits of orange zest -- so yummy!
 Nutrition for 1/9th of recipe, or 1 cookie: cals: 37kcal | fat: 0.89g | carbs: 6.99g | prot: 0.87g


Also, check out the facebook page for Direct Relief. 105 year old Edythe wants 105,000 "likes" for her favorite charity. Please help her out by "liking" Direct Relief's page!

Thursday, December 6, 2012

Brendan Brazier's 6 Stress Busting Tips for the Holidays


Monday night was great, then really great, then kinda horrible. A few days ago I signed up for a class/ q and a session with Brendan Frazier on LearnItLive. It was free, and I thought the idea of a live q and a with one of the top vegan fitness/ nutrition guys sounded pretty awesome. I didn't take good enough notes to remember what specifically his 6 stress busting tips were but I think you can listen to a recording of the session here.

What I really liked was his talking about whole foods, fewer grains (and more psuedo-grains like quinoa and amaranth), and alkaline boosting foods-- which I've been meaning to look into, and how to get your nutrient-rich foods on the cheap. So that was the great part. Then the great part-- he answered my question in the q and a section! And it was the last question answered, so it might not have happened at all. I asked about muscle soreness after working out. See, I get sore. Really, really sore. If I do like, one 15 minute workout I can't move very well for the next 4 days kind of sore. I try to make sure I eat enough protein (and when I was counting calories I would track protein specifically), eat before and after workouts, get enough iron, eat healthily, and drink enough water. First off, he said some muscle soreness is really good, especially when you're switching up your routine. I'm cool with that. He said if you are super sore day after day, even when you are doing the same types of workouts consistently that that is a problem. That's the boat I'm in.

So what was his answer? Three parts, non of which was "take a certain supplement", which I thought was pretty cool. Part one: alkaline foods. Still need to look into that, about to go do that right now. Part two: higher-quality protein, like pea and hemp. My protein powder has these but next time I order, I'll get something with a higher percentage of each. Part three: greens! This was kind of an "aha!" moment for me. I eat greens, I like them, but I wouldn't say they're a huge part of my life. I get a bag of spinach, some broccoli, and maybe something else a week. Sometimes it's spinach or broccoli. I also love kale but I haven't been feelin' it. That's gonna have to change. He said a green smoothie every day for breakfast is great and that plus other greens have chlorophyll, which is apparently great for muscles! Good to know. I'll bulk up my greens and let you guys know how my workouts go. Does anyone else have this muscle soreness issue? Did you find anything that helps?

Oh yeah, the horrible part. It got better this morning so don't worry. Remember my post about our kitties? One of them got out of the window Monday night and we couldn't find him. And he'd never been outside before (well he was born outside, but pretty quickly came in and has been a snuggle-bug-not-so-outdoorsy type since then). Anyway, We found him Tuesday morning, on the roof, just chillaxin' like nothing happened. If he wants to go outside, more power to him, but I thought he'd be scared so I was all worried. He napped all day long Tuesday, so I guess he had quite the adventure, and since he's obviously not upset, I'm fine now too.


This is him. His name is Little Prince. I call him Little or Little Kitten most of the time.


He doesn't love pictures. This is him looking all grumpy and also huge-- he only weighs about 9.5 pounds and he's usually not grumpy, so just ignore the giant grumpy cat-man in front of you, but look at his big, bold stripes on his arms and the spots on his tummy-- isn't that awesome? I think he's pretty. Or handsome. But he's a cat, so he can be pretty, right?

Thursday, October 18, 2012

Chickpea and Leek Soup


This yummy soup comes from Jamie Oliver. I've simplified it, veganized it, and made it several times-- that's quite a testament, because there are many things that I only make once or twice. I love the combo of butter (margarine) and olive oil and it's all just very tasty. And so quick and easy that it's perfect for these days when we're never sure if it'll be chilly or not. Without further ado... the recipe:


Makes about 8 cups
Ingredients:
  • 1 tablespoon margarine
  • 1 teaspoon olive oil
  •  1 clove garlic (optional)
  • about 4 cups sliced leek (about 2 leeks)
  • 2 cans chickpeas, drained and rinsed
  • 2 cups water
  • 2 cups vegetable broth (I use Swanson Flavor Boost packets mixed with water bc they're cheaper and take up less room)
  • 1 tablespoon nutritional yeast (optional)
Directions:
  • Prep your leeks: remove tough green parts, rinse the outsides, and slice into thin rings. Rinse very well in a colander or salad spinner. Lay on a towel to somewhat dry if using a colander, spin the thingy if using a salad spinner. This can be done a couple of days in advance if you want. Also, whatever I don't use in the soup, I freeze in baggies and it's so easy to just scoop a 1/2 cup or so out for stirfrys, pasta, or whatever you're making later.
  • Add leeks, margarine, oil, and minced garlic to a pot. Cook over medium heat until leeks are fragrant.
  • Add chickpeas and cook until slightly toasty.
  • Add veggie broth and water and bring to a boil.
  • Add nutritional yeast if you want (I think it enhances the taste).
  • Eat a bowlful, curled up on the couch-- or at a table if that's your thing.
  • Enjoy!
Per cup: cals: 155kcal | fat: 3.85g | carbs: 27.98g | prot: 7.57g

Friday, September 28, 2012

Mushroom Soup


This soup is my new go-to for a decadent-feeling treat. It's creamy, earthy, and at 49 calories per cup it's really, really low-calorie-- woohoo for that!

It's also really, really easy to make. That makes it just about the best soup ever. But don't take my word for it-- try it and let me know what you think!

Ingredients:

  • 1/2 cup diced onion (I like to dice up a large onion when I get back from the store and just keep it in the fridge in tupperware for use throughout the week-- just don't store it in a plastic baggie or your entire fridge will smell/taste like onions)
  • 1 tsp olive oil
  • salt and pepper
  • 1/2-3/4 pound cremini, button, or portabella mushrooms, sliced thin (about 5 cups)
  • 2 cups veggie stock (I like Swanson Flavor Boost mixed with water for a super quick, cheap stock)
  • 4 cups Original Unsweetened Almond Breeze Almond Milk (or any other plain, unflavored milk)
Directions:
  • Add onions and oil to a soup pot. Turn heat to medium low.
  • Once the onion start to color just a bit and get fragrant, add the mushrooms. Season lightly with salt and pepper.
  •  Turn heat up just a bit and stir occasionally until the mushrooms release their moisture. They'll get smaller and browner-- this is what you want. The pan shouldn't dry out or burn but if it gets dry, add a little water and keep going.
  • When you think your mushrooms are done, add the broth and milk and bring to a slow boil.
  • Add a bit more salt and pepper!
  • Once it starts boiling (don't let it get too fast or you'll curdle your milk-- it'll just make the appearance a little less creamy, it's not really a big deal) turn it off.
  • Transfer about 1/2 of your soup to a blender and blend away (this could take a couple of minutes).
  • Transfer it back to the pot, stir, and check and adjust your seasonings.
  • Garnish with a drizzle of olive oil and some fresh cracked pepper.
  • Makes about 7 cups.
Per 1 cup: cals: 49kcal | fat: 2.82g | carbs: 5.08g | prot: 2.22g

 Also, it can be made with unprocessed ingredients if you make this with homemade veg stock and almond (or other) milk!

Sunday, August 12, 2012

Pureed Beet Soup


I found this recipe a long time ago on marthastewart.com and it's one that I go back to again and again. I just swapped out the chicken broth for veggie stock, lessened the onion a bit, and added more water, since I like it thinner. The result is a sweet, low-calorie soup that can be eaten hot or cold, and it's one of the only ways I'll eat beets! I'm really picky about my beets-- I really love beets in this soup and in chip form, and in green juices, but other than those, I haven't found another way for me yet-- I'd love to hear how you like your beets! This soup is especially good with simple accompaniments, like the kale and polenta in the photo-- I just cooked the kale in 1/2 tsp olive oil until it was the wilti-ness I wanted and used about 1 tsp of oil, plus salt and pepper for the polenta and just cooked that over medium high until crispy on the edges.

Here's the recipe!

Pureed Beet Soup
makes 9.5 1 cup servings

Ingredients:
  •  1 tsp olive oil
  • 1/2 large onion, diced
  • salt and pepper to taste
  • 3 large beets, peeled and diced (about 7.5 cups)
  • 2-3 boullion cubes or 2-3 cups veggie stock
  • 6-9 cups water
Directions:
  • Add  the oil and onions to a soup pot and saute on medium high, adding a little salt and pepper.
  • And the beets, veggie stock, and water and bring to a boil. Reduce heat and simmer until beets are tender, about 20 minutes.
  • Blend with an immersion or regular blender, in batches if needed, making sure to vent the lid and cover with a towel to allow the heat to escape but so that it doesn't splash you with hot soup if using a regular blender.
  • Serve with salt, pepper, and lemon juice. So yummy and really healthy too!
 cals per 1 cup: 70kcal | fat: 1.93g | carbs: 11.06g | prot: 2.75g


Look at that pretty beet-pink!

Tuesday, February 21, 2012

Sunbutter

Like many others, I've been trying to cut back on processed food. My husband Sam is allergic to nuts but he can eat Skippy brand peanut butter without a problem usually (it makes him itchy sometimes, but it's not life-threatening). He loves pb&j's and peanut butter cookies, but my thought is, if Skippy is so processed that someone allergic to nuts isn't allergic to it anymore, maybe it's a bit too processed. So I've been thinking about sunflower seed butter, but it's expensive at the store. So I set out to make my own. I don't have in process pics but there are some great ones at Peas and Thank You. I don't have a food processor either, or a high-powered blender, but my trusty ol' Oster did the job. Mine doesn't have any added oil but I did add a bit of salt and just a hint of honey (or agave, or maple syrup, or just sugar).

Ingredients:
  • 1.5 cups roasted sunflower seeds
  • 1/4 tsp salt
  • 1/2 tsp honey or other sweetener
Directions:
  1. Add the seeds and the salt to your blender and start blending.
  2. When the mixture gets stuck and isn't moving through the blender, stop and push it around (I did this with a butter knife).
  3. The seeds will get ground up and then will start getting a bit clumpy.
  4. At this point, I stopped the blender and did some errands, because the blender was getting overheated.
  5. Then blend some more, still stopping a lot to push things around. It will start getting really smooth.
  6. Add the sweetener and blend some more. It should get smooth and creamy. If it never gets smooth, add a tablespoon or 2 of a neutral tasting oil.
  7. Transfer to a jar and use like you would peanut butter. Enjoy!

Wednesday, January 25, 2012

Taco Seasoning

It's difficult to find dairy-free taco seasoning at the store, so I've had to resort to making my own. It's not that hard and it's way cheaper than those little packages. This is the recipe I use-- just put all of the ingredients into a mason jar, put the lid on, and shake it up. Then just measure out whatever you need-- it measures like store-bought and a serving is 2 teaspoons.


Ingredients
  • 6 T chili powder
  • 4 T onion powder 
  • 2 T cumin
  • 2 T garlic powder
  • 2 T paprika
  • 2 T leaves oregano
  • 2 T sugar
  • 2 tsp cornstarch
  • 1 1/2 tsp cayenne
  • 1 tsp ground pepper
  • 1 tsp salt
Nutrition Facts: 20 calories for 2 tsps.